How To Master 3D Picture Cube In Easy Steps
Originally posted on December 2, 2023 @ 4:40 pm
This guide will demonstrate the process of designing an impressive 3D picture cube with the use of Photoshop. Whether you are a novice or an expert, these simple instructions will aid you in mastering the skill of producing a 3D image that will leave a lasting impression. Let’s begin and unleash your imagination!
Key Takeaways:
- Create a 3D picture cube using Photoshop
- Wrap your photographs onto a 3D cube
- Add lighting effects to enhance your cube
- Animate your 3D picture cube
- Draw a 3D cube freehand
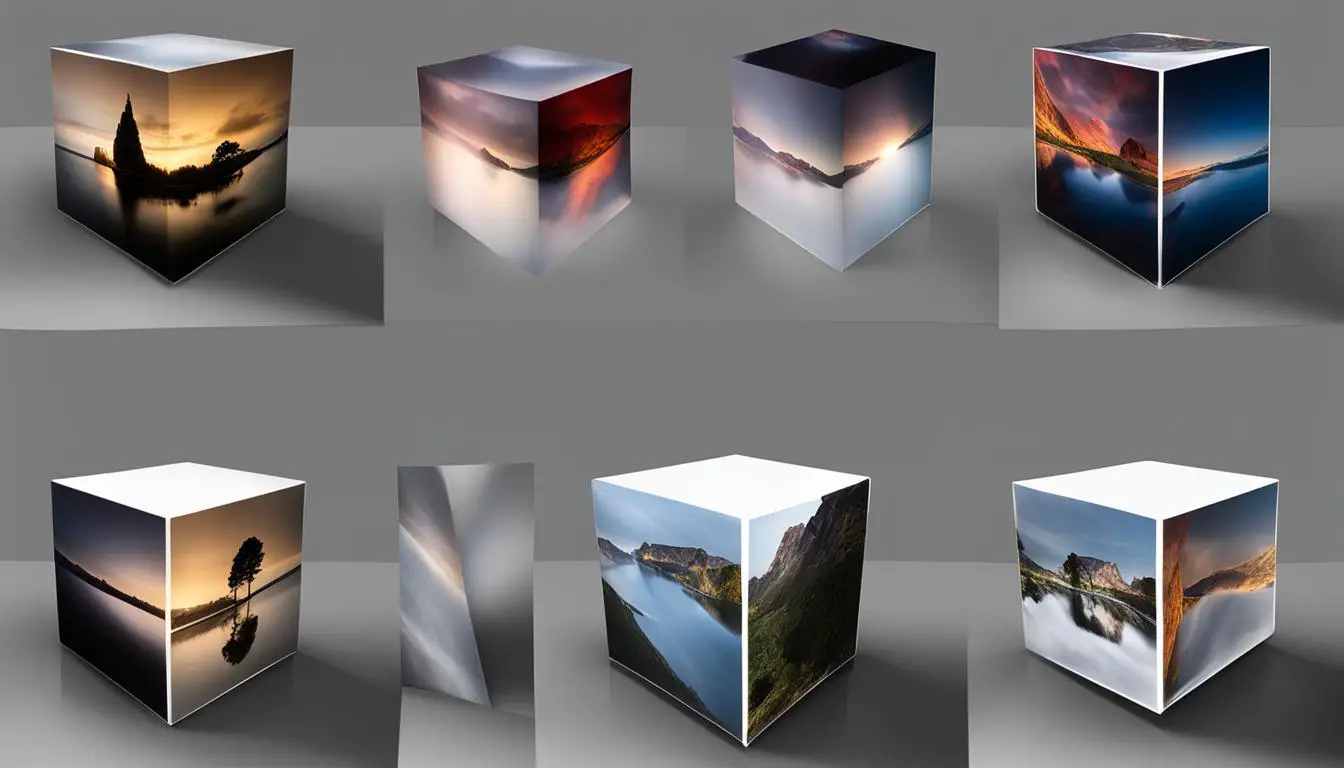
Getting Started: Wrapping Your Photographs onto a 3D Cube
To create a stunning 3D picture cube, the first step is to wrap your photographs onto a 3D cube using Photoshop. This process allows you to add a personal touch to your cube by showcasing your own images. Here’s how you can get started:
- Begin by selecting a square photograph that you want to wrap onto the cube.
- In Photoshop, go to the 3D menu and choose “New Mesh From Layer” and then select “Mesh Preset” followed by “Cube”. This will create a 3D cube in your workspace.
- Use the tumble tool to rotate the cube and position your photo on the front face. This will be the main image that will be visible when the cube is viewed from the front.
- To add images to the other faces of the cube, use the materials panel and properties panel. Select each face and replace the texture with another photograph of your choice.
- Repeat these steps for each face of the cube, ensuring that you have wrapped your desired photographs onto each side.
By following these simple steps, you can easily create a 3D cube with your photographs wrapped around it, giving it a personalized touch.
“Creating a 3D picture cube with your own photographs is a great way to showcase your memories and add a unique element to your home decor.”
Now that you have successfully wrapped your photographs onto the 3D cube, you can move on to the next step of enhancing the appearance of your cube by adding lighting effects.

Table: Materials and Tools
| Materials | Tools |
|---|---|
| Square photographs | Photoshop |
| Computer or laptop | Tumble tool |
| Materials panel | |
| Properties panel |
Adding Lighting Effects to Enhance Your 3D Picture Cube
To enhance the appearance of your 3D picture cube, you can add lighting effects. In Photoshop, go to the 3D panel and choose the lightbulb icon to access the lighting options. Use the lighting widget to set the direction of the light and adjust the softness of the shadows. By experimenting with different lighting setups, you can create a customized look for your cube. This can be particularly useful if you’re creating a crystal or laser engraved photo cube, as the lighting can bring out the details and make the cube stand out.
“Adding lighting effects to your 3D picture cube can take it to the next level. By strategically placing light sources and adjusting their settings, you can create a captivating visual experience. The interplay of light and shadows can make your cube appear more realistic and dynamic. Whether you want to showcase the brilliance of a crystal cube or emphasize the engraved details on a photo cube, lighting effects can make a significant difference.”
When adding lighting effects, it’s important to consider the overall mood and atmosphere you want to convey. Soft, diffused lighting can create a gentle, dreamy effect, while strong, directional lighting can add drama and depth. Take into account the subject matter of your cube and choose lighting that complements it. Play around with different angles and intensities until you achieve the desired impact.
Remember that lighting is a powerful tool that can transform the look and feel of your 3D picture cube. Don’t be afraid to experiment and push the boundaries of creativity. With the right lighting effects, you can elevate your cube from a simple 3D image to a captivating work of art.

Animating the Cube
Now, move the playhead to the end of the timeline, where you want the animation to finish. Adjust the Y-axis rotation property in the properties panel to make the cube spin or move in the desired direction. By experimenting with different values and movements, you can create a variety of captivating animations for your 3D picture cube.
Once you have finalized the animation, you can render it to a video format and export it for sharing or further editing. This allows you to showcase your animated 3D picture cube on various platforms, such as social media or your personal website. The dynamic nature of the animation is sure to impress your audience and make your creation stand out.
Tips for Creating Engaging Animations
Here are a few tips to help you create stunning and captivating animations for your 3D picture cube:
- Experiment with different rotation angles and speeds to find the most visually appealing movement.
- Consider adding additional effects, such as lighting changes or particle effects, to enhance the overall animation.
- Keep the animation duration in mind. A short and concise animation can often have a more significant impact than a lengthy one.
- Seek inspiration from other animated 3D objects or graphics to get ideas for unique and innovative animations.
By following these tips and exploring your creativity, you can create mesmerizing and eye-catching animations for your 3D picture cube. Let your imagination run wild and bring your cube to life with captivating animation effects.
Drawing a 3D Cube Freehand
If you prefer a more hands-on approach to creating 3D picture cubes, you can try drawing them freehand. This method allows for more personalized and custom creations. To get started, all you need is paper, a pencil, and some basic drawing skills.
To draw a 3D cube freehand, begin by sketching the corner of the cube closest to you. Then, add the bottom edges, top edges, and sides to connect the lines and form a cube shape. Remember to pay attention to the proportions and angles to create a realistic look.
Shading is another important aspect when drawing a 3D cube. Determine the light source and add shading accordingly to create depth and dimension. This will give your cube a more realistic and three-dimensional appearance. With practice, you’ll be able to master the art of drawing a 3D cube freehand and create unique and personalized picture cubes.

Tips for Drawing a 3D Cube Freehand:
- Use a two-point perspective technique
- Start with basic shapes and proportions
- Pay attention to angles and perspectives
- Add shading to create depth and dimension
“Drawing a 3D cube freehand allows for more creativity and personalization. It’s a great way to showcase your artistic skills and create unique picture cubes.”
Avoiding Common Mistakes When Drawing a 3D Cube
Drawing a 3D cube may seem challenging, but with the right techniques and attention to detail, you can create impressive and accurate representations. However, there are common mistakes that beginners often make when drawing a 3D cube. By being aware of these mistakes and taking steps to avoid them, you can improve your drawing skills and create more realistic and visually appealing cubes.
Using the Overlapping Squares Method
One common mistake is using the overlapping squares method to draw a cube. This technique involves drawing a series of overlapping squares and connecting the corners to form a cube. While this may seem like a straightforward approach, it often results in unrealistic and inaccurate cubes. Instead, focus on understanding the concepts of shape and form.
Shapes are 2D representations, while forms are 3D objects with depth and volume. When drawing a cube, it’s important to think in terms of forms rather than just shapes. This means considering the three-dimensional structure of the cube and accurately representing its proportions and angles.
Ignoring Angle and Perspective
Another mistake to avoid is not paying attention to the angle and perspective of the cube. A cube can be viewed from various angles, and each angle will result in a different representation of the cube. To create a realistic and accurate drawing, it’s important to consider the viewpoint and adjust your lines and angles accordingly.
Take your time to study the cube from different perspectives and practice drawing it from various angles. This will improve your understanding of the cube’s structure and help you accurately represent its proportions and depth in your drawings.
Tips for Overcoming Common Mistakes
To overcome these common mistakes and improve your cube drawing skills, here are some tips:
- Focus on understanding the concepts of shape and form rather than relying on the overlapping squares method.
- Pay attention to the angle and perspective of the cube, adjusting your lines and angles accordingly.
- Practice drawing cubes from different perspectives to improve your understanding of their three-dimensional structure.
- Use reference images or objects to help you understand the dimensions and angles of a cube.
- Take your time and be patient with your drawings, as mastering the art of drawing a 3D cube takes practice.
By avoiding these common mistakes and following these tips, you can enhance your cube drawing skills and create more realistic and visually appealing representations. Remember, drawing is a skill that takes time and practice to master, so don’t be discouraged if your first attempts are not perfect. Keep experimenting, learning, and refining your technique, and you’ll soon be able to create stunning 3D cube drawings.
| Mistake | Why it’s a Mistake | How to Avoid it |
|---|---|---|
| Using the Overlapping Squares Method | Results in unrealistic and inaccurate cubes. | Focus on understanding shape and form, think in terms of three-dimensional structure. |
| Ignoring Angle and Perspective | Leads to inaccurate representations of the cube. | Consider the viewpoint, adjust lines and angles accordingly. |
Tips for Easy Cube Drawing
When it comes to drawing a 3D cube, there are some tips and techniques that can make the process easier and more enjoyable. By following these suggestions, you can improve your skills and create impressive cube drawings.
Start with a Reference
Using a model cube or a square object as a reference can be incredibly helpful. It allows you to understand the dimensions and angles of a cube, making it easier to create accurate drawings. You can observe the object from different angles and use it as a guide for your own drawings. Whether it’s a Rubik’s Cube, a wooden block, or even a picture of a cube, having a reference will provide a solid foundation for your artwork.
Use Drawing Tools
Drawing tools like rulers and set squares can assist you in creating precise lines and angles. Straight lines are essential when drawing cubes, and using these tools can help you achieve clean, accurate edges. Additionally, using a compass or a circle template can help you create curved lines or circular objects within your cube drawing.
Trace the Front
Tracing the front face of the cube can ensure that you get the proportions right. Place a transparent sheet or tracing paper over your reference cube and trace its outline. This will give you a solid starting point for drawing the rest of the cube. It’s important to note that tracing should be used as a learning tool and not as a means to create finished artwork. The goal is to understand the structure and dimensions of the cube, allowing you to draw it freehand with confidence.
Practice and Patience
Like any skill, drawing cubes takes practice and patience. Don’t be discouraged if your first attempts don’t turn out as expected. Keep practicing, observing real-life cubes, and studying different perspectives. With time, you’ll become more comfortable with the process and develop your own unique style.
By following these tips and incorporating your own creativity, you can master the art of drawing 3D cubes and create captivating artwork. Remember to enjoy the process and let your imagination run wild!
Conclusion
Creating 3D picture cubes can be a truly rewarding and enjoyable artistic pursuit. Whether you choose to use Photoshop to wrap your photographs onto a 3D cube or prefer to draw a cube freehand, the possibilities are endless. The results can be stunning and make for perfect gifts or eye-catching photo cube displays.
An added tip is to consider the use of lighting effects to enhance the visual appeal of your 3D picture cubes. By experimenting with different lighting setups, you can bring out the details and make your cube stand out even more. Additionally, animating your cube can add another dynamic element to your creations, making them even more captivating.
Lastly, it’s important to avoid common mistakes when drawing a 3D cube. Taking the time to understand the concepts of shape and form, paying attention to angles and perspectives, and practicing drawing from different viewpoints can greatly improve your skills.
With practice and the right tools, such as the ones mentioned in this article, you can unleash your creativity and start mastering the art of the 3D picture cube. So go ahead, dive into this fascinating world, and surprise your loved ones with personalized gifts or create stunning photo cube displays that will leave everyone in awe.
FAQ
What do I need to create a 3D picture cube using Photoshop?
You will need a square photograph and access to Photoshop.
How do I create a 3D cube in Photoshop?
In Photoshop, select the 3D>New Mesh From Layer>Mesh Preset>Cube option to create a 3D cube.
Can I use any photograph to wrap onto the cube?
Yes, you can use any square photograph you want to wrap onto the cube.
How do I add images to the other faces of the cube?
Use the materials panel and properties panel in Photoshop to select and replace textures on the other faces of the cube.
How can I enhance the appearance of my 3D picture cube?
You can add lighting effects in Photoshop to give your cube the desired effect. Use the lighting options in the 3D panel to set the direction and softness of the light.
Can I animate my 3D picture cube?
Yes, you can animate your cube in Photoshop. Open the timeline, create frame animation, and adjust the Y-axis rotation to make the cube spin.
What if I prefer to draw a 3D cube freehand?
You can use a two-point perspective technique to draw a 3D cube freehand. Start by drawing the corner closest to you and then add the edges and sides.
Are there common mistakes to avoid when drawing a 3D cube?
Yes, some common mistakes include using the overlapping squares method and not paying attention to the angle and perspective of the cube.
How can I make cube drawing easier?
Using a model cube or square object as a reference, using drawing tools like rulers and set squares, and tracing the front of the cube can all make cube drawing easier.