Raspberry Pi Doctor TARDIS: 3D Printed Project
Originally posted on January 7, 2024 @ 8:38 pm
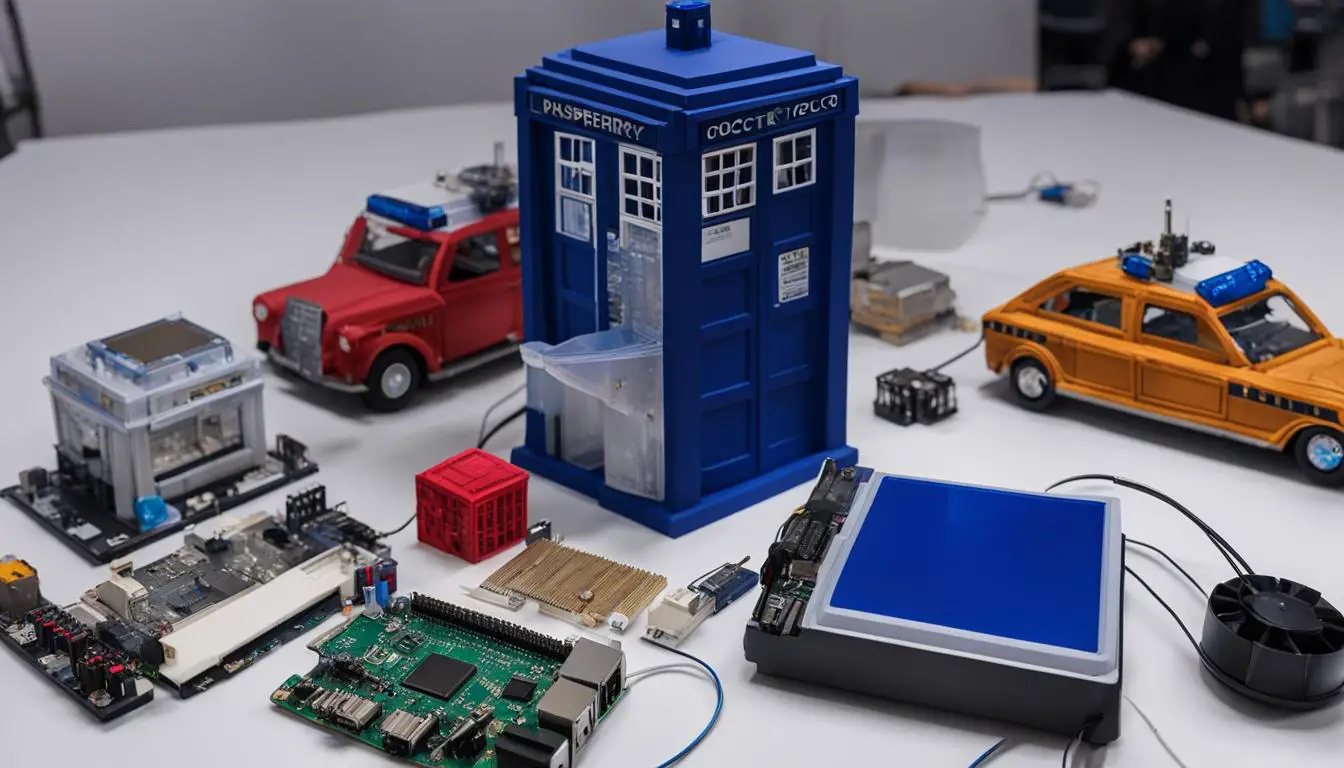
Welcome to our tutorial for constructing a Raspberry Pi Doctor TARDIS, the perfect project for fans of Doctor Who and technology lovers! This project is inspired by the iconic time machine from the beloved TV series Doctor Who and provides you with the opportunity to design your own TARDIS case for your Raspberry Pi.
By combining the power of 3D printing and Raspberry Pi technology, you can bring a touch of Whovian charm to your tech projects. The design files for this 3D printed case are readily available on Thingiverse, making it easily accessible for all enthusiasts to bring their own TARDIS to life.
Key Takeaways:
- The Raspberry Pi Doctor TARDIS is a 3D printed project inspired by the iconic time-traveling spaceship from Doctor Who.
- Users can create their own TARDIS case designs for their Raspberry Pi, adding a touch of Whovian charm to their tech projects.
- The design files for the 3D printed case are available on Thingiverse, making it easily accessible for enthusiasts.
- Building a Raspberry Pi Doctor TARDIS involves 3D printing the necessary parts and adding electronics and circuitry for enhanced functionality.
- Join the vibrant Raspberry Pi Doctor TARDIS community to connect with fellow enthusiasts and share your creations.
Building the Tardis Case
To bring their Raspberry Pi Doctor TARDIS to life, users can start by 3D printing the necessary parts. By utilizing designs available on platforms like Thingiverse, such as the TARDIS Deluxe Kit created by countspatula, users have the flexibility to customize their TARDIS case. For example, they can choose to incorporate a detachable roof, allowing for easier access to USB and network ports. Whether through the use of 3D printing services or by owning a 3D printer, enthusiasts can bring their unique Raspberry Pi Doctor TARDIS design to reality.
By following the provided step-by-step instructions, users can assemble the printed parts, creating their own distinctive Raspberry Pi Doctor TARDIS case. With attention to detail and careful construction, the TARDIS case can accurately capture the essence of the iconic Doctor Who time-traveling spaceship.

Alongside the visual guide provided by the 3D printed parts, users can also refer to detailed assembly instructions to ensure a successful build. These instructions outline the process of combining individual components, securing them in place, and achieving a finished TARDIS case that is both functional and aesthetically pleasing.
Creating a Raspberry Pi Doctor TARDIS case is not just about technical proficiency; it’s also a chance to unleash your creativity. By personalizing the design and incorporating unique features, you can infuse your own style and vision into the TARDIS case, making it truly one-of-a-kind.
For enthusiasts who are new to 3D printing or electronics, building the TARDIS case can be an exciting learning opportunity. With each step, you’ll gain valuable insights into the world of 3D printing, design optimization, and circuitry assembly. Don’t be afraid to experiment and make adjustments along the way, as it’s all part of the journey to create your perfect Raspberry Pi Doctor TARDIS case.
Required Supplies for Building the Raspberry Pi TARDIS Case
| Supplies | Description |
|---|---|
| 3D Printer or 3D Printing Service | The primary tool for printing the TARDIS case parts. Users can either own a 3D printer or utilize services provided by online platforms or local businesses. |
| Filaments | Various filaments are needed for printing the different parts of the TARDIS case. Blue filament for the TARDIS body and clear filament for the windows are commonly used options. |
| Electronics and Circuitry Components | These components, including transistors, capacitors, resistors, LEDs, and more, are essential for adding functionality to the Raspberry Pi Doctor TARDIS case. They enable features like LED lighting and audio playback. |
| Tools (Screwdriver, Wire Cutters, etc.) | Basic tools are required for assembling the TARDIS case and integrating the electronics. These may include a screwdriver, wire cutters, and other common tools. |
Having these supplies readily available will ensure a smooth and efficient building process, allowing you to fully immerse yourself in the creation of your Raspberry Pi Doctor TARDIS case.
Adding Electronics and Circuitry
In addition to the 3D printed case, you can take your Raspberry Pi Doctor TARDIS to the next level by incorporating electronics and circuitry. By adding these components, you can bring your Doctor Who-themed Raspberry Pi case to life with LED lighting and audio features.
Some essential components for enhancing your Raspberry Pi TARDIS case include:
| Component | Description |
|---|---|
| 2N2222 Transistor | Enables control of larger currents through the use of a smaller current |
| 22uf Capacitor | Stores and releases electrical energy, contributing to stable operation |
| 5V Regulator | Converts higher input voltage to a stable 5V for powering the circuit |
| 555 Timer | Produces oscillating signals used for various timing functions |
| Switch | Controls the flow of electricity through the circuit |
| Resistors | Controls the flow of current through the circuit, limiting voltage and current levels |
These components can be customized and arranged to create different effects, such as LED fading and synchronized music playback. By following the provided instructions and wiring diagrams, you can assemble the circuitry and integrate it seamlessly into your TARDIS case design.
Once the circuit is complete, you can program your Raspberry Pi to trigger the desired lighting and audio effects. This could involve using Python or other programming languages to control the circuit and synchronize it with specific events or actions.
Remember to follow safety precautions and consult online resources or forums for additional guidance if needed. By adding electronics and circuitry, you can take your Raspberry Pi TARDIS case from a mere replica to an interactive Doctor Who masterpiece!

Sourcing the Required Supplies
To build the Raspberry Pi Doctor TARDIS, we will need a variety of supplies. These include:
3D Printing Supplies
- Blue filament for the TARDIS body
- Clear filament for the windows
Electronic Components
- Transistors
- Capacitors
- Resistors
- LEDs
Additional Supplies
- TF MP3 decoder
- Speaker
- Wires
- Protoboard
- 9V battery case
- 5V LED strip
These supplies can be easily sourced from online retailers or local electronics stores. We recommend checking websites like Amazon, Adafruit, or SparkFun for a wide range of options. It’s important to ensure that the filaments are compatible with your 3D printer and that the electronic components meet the required specifications for the Raspberry Pi Doctor TARDIS project.
By gathering all the necessary supplies, we can proceed with confidence to the next step of building our Doctor Who-inspired Raspberry Pi case.
Step-by-Step Assembly Guide
Once you have 3D printed all the required parts for your Raspberry Pi Doctor TARDIS, it’s time to assemble your very own time-traveling tech project. Follow these step-by-step instructions to bring your TARDIS case to life:
- Print the Parts: Start by 3D printing the TARDIS body, windows, LED strip holder, and roof. Make sure to use blue filament for the TARDIS body and clear filament for the windows to capture the iconic Doctor Who look.
- Assemble the Circuitry: Next, gather all the required electronic components, such as transistors, capacitors, resistors, LEDs, and more. Follow the provided wiring instructions to connect the components and create a custom circuit for your TARDIS case.
- Attach the Electronics: Once the circuit is complete, carefully attach the electronic components to the TARDIS case. Secure the protoboard inside the case to ensure a neat and organized assembly.
- Add the Windows and LED Strip: With the electronics in place, it’s time to add the 3D printed windows and LED strip holder. Carefully align and attach these components to the TARDIS body according to the design specifications.
- Complete with the Roof: Finally, add the 3D printed roof to your Raspberry Pi Doctor TARDIS. This will give your project a polished and finished look, completing the assembly process.
Once you’ve completed these steps, you’ll have your very own 3D printed Raspberry Pi Doctor TARDIS, ready to showcase its Whovian charm. Get creative with the customization options, such as painting or adding decals to make your TARDIS even more unique.

| Step | Description |
|---|---|
| 1 | Print the TARDIS body, windows, LED strip holder, and roof using 3D printing techniques. |
| 2 | Assemble the circuitry by following the wiring instructions and connecting electronic components. |
| 3 | Attach the electronics to the TARDIS case and secure the protoboard. |
| 4 | Add the 3D printed windows and LED strip holder to the TARDIS body. |
| 5 | Complete the assembly by attaching the 3D printed roof to the Raspberry Pi Doctor TARDIS. |
Showcasing the Final Product
Now that the Raspberry Pi Doctor TARDIS is fully assembled, it’s time to showcase the impressive final product. The combination of the 3D printed TARDIS case and the integrated circuitry creates a visually appealing and functional Raspberry Pi enclosure that will captivate Doctor Who fans and tech enthusiasts alike.
The TARDIS case features intricate details and a design that closely resembles the iconic time-traveling spaceship from the beloved TV show. The 3D printing technology allows for precise replication of the TARDIS, ensuring an authentic Doctor Who experience. The case serves as a perfect homage to the show while providing protection for your Raspberry Pi.
To add an extra touch of magic, the Raspberry Pi Doctor TARDIS incorporates LED lighting. With dynamic visual displays, the LED lights bring the TARDIS to life, illuminating your tech project and creating an eye-catching centerpiece. The LED lighting can be customized to match your mood or preference, providing a truly unique experience.

But it doesn’t stop there! The Raspberry Pi Doctor TARDIS also offers an immersive audio experience. By integrating audio playback capabilities, you can enjoy your favorite Doctor Who theme or sound effects while using your Raspberry Pi. Whether you’re binge-watching Doctor Who episodes or working on your latest tech project, the audio will transport you into the Doctor Who universe.
“The 3D printed Raspberry Pi Doctor TARDIS combines the best of both worlds: the functionality of a Raspberry Pi and the charm of Doctor Who. It’s the perfect fusion of technology and fandom, making it an exceptional choice for fans and tech enthusiasts looking for a standout Raspberry Pi case.”
Furthermore, the Raspberry Pi Doctor TARDIS allows for endless customization possibilities. You have the freedom to choose your own Doctor Who theme or sound effects, personalizing your TARDIS to align with your favorite Doctor or memorable moments from the show. This level of customization adds a personal touch, making your Raspberry Pi Doctor TARDIS truly unique.
How can you utilize the Raspberry Pi Doctor TARDIS? The possibilities are vast. You can use it as a media center, streaming your favorite Doctor Who episodes or other media content. Alternatively, you can proudly display it as a decorative tech piece, showcasing your love for the Doctor Who universe. Whichever way you choose to utilize it, the Raspberry Pi Doctor TARDIS is guaranteed to turn heads and spark conversations.
Key Features of the Raspberry Pi Doctor TARDIS
| Feature | Description |
|---|---|
| 3D Printed Design | A meticulously designed TARDIS case, accurately replicating the iconic spaceship from Doctor Who. |
| LED Lighting | Customizable LED lighting brings the TARDIS to life, creating a captivating visual display. |
| Integrated Circuitry | The integration of audio playback and other electronics adds functionality to the TARDIS case. |
| Customization Options | Choose your own Doctor Who theme or sound effects, making the TARDIS truly personalized. |
| Versatile Usage | Perfect as a media center, decorative tech piece, or conversation starter for Doctor Who fans. |
With its combination of stunning design, customizable features, and versatile usage, the Raspberry Pi Doctor TARDIS stands as one of the best 3D printed Raspberry Pi cases available.
Support and Community Engagement
The Raspberry Pi Doctor TARDIS community is a vibrant and supportive space for enthusiasts to connect and engage. By joining online forums and social media groups, users can share their experiences, seek advice, and connect with fellow Doctor Who fans and Raspberry Pi enthusiasts. Engaging with the community not only fosters a sense of camaraderie but also provides a platform for collaboration and inspiration.
Platforms like Thingiverse and Cults3D allow users to showcase their TARDIS designs, share their creations, and collaborate with others. This opens up a world of possibilities for customization and innovation in Doctor Who-themed Raspberry Pi cases. Whether it’s sharing design modifications, troubleshooting technical issues, or simply appreciating each other’s projects, the community is there to support and uplift one another.
By actively participating in the Raspberry Pi Doctor TARDIS community, users can expand their knowledge, gain valuable insights, and contribute to the ongoing development of Doctor Who-themed Raspberry Pi enclosures. Whether you’re a newcomer looking for guidance or an experienced enthusiast eager to share your expertise, the community welcomes everyone with open arms. Join us today and let’s embark on this exciting journey together!

- Connect with fellow enthusiasts
- Share experiences and project ideas
- Collaborate on design modifications
- Seek advice and troubleshooting support
- Stay updated on the latest innovations in Doctor Who-themed Raspberry Pi cases
“Being part of the Raspberry Pi Doctor TARDIS community has been an incredible experience. The support and expertise shared by the members have helped me turn my passion into reality. Together, we’re pushing the boundaries of creativity and technology!” – Sarah, Raspberry Pi enthusiast
Check out some of the amazing Doctor Who-themed Raspberry Pi enclosures created by our talented community members:
| TARDIS Design | Designer |
|---|---|
 |
Tom |
 |
Jessica |
| Mike |
Conclusion
Building a 3D printed Raspberry Pi Doctor TARDIS is an exciting and rewarding project that combines the worlds of Doctor Who fandom and technology. With the availability of design files and step-by-step instructions, creating your own TARDIS-inspired enclosure for your Raspberry Pi has never been easier.
By embracing your inner Whovian and adding electronics and circuitry to your TARDIS case, you can take your project to the next level. Not only will your Raspberry Pi be housed in a stylish and unique case, but you can also enhance its functionality with features like LED lighting and audio playback.
With the right supplies and a passion for Doctor Who, you too can bring the iconic charm of the TARDIS to your tech projects. Let your creativity soar as you embark on this DIY journey, joining a vibrant community of Doctor Who fans and technology enthusiasts who are pushing the boundaries of what Raspberry Pi can do.
FAQ
What is the Raspberry Pi Doctor TARDIS?
The Raspberry Pi Doctor TARDIS is a 3D printed project inspired by the iconic time-traveling spaceship from the popular TV show Doctor Who.
Where can I find the design files for the Doctor TARDIS case?
The design files for the 3D printed Doctor TARDIS case can be found on Thingiverse, making it easily accessible for enthusiasts to bring their own TARDIS to life.
How do I 3D print the Doctor TARDIS case?
To create the TARDIS case, users can start by 3D printing the necessary parts. They can find a design on Thingiverse, such as the TARDIS Deluxe Kit by countspatula. The design allows for customization, with options like a detachable roof for easier access to USB and network ports.
What electronics and circuitry can I add to the Doctor TARDIS case?
Users can enhance their Raspberry Pi Doctor TARDIS by adding components like the 2N2222 Transistor, 22uf Capacitor, 5V Regulator, 555 Timer, Switch, and various resistors. These components allow for the creation of a circuit that enables features like LED lighting and audio playback.
Where can I source the required supplies for the Doctor TARDIS?
Supplies like filaments for 3D printing, electronic components, TF MP3 decoder, speaker, wires, protoboard, 9V battery case, and 5V LED strip can be easily sourced from online retailers or local electronics stores.
How do I assemble the Raspberry Pi Doctor TARDIS?
The assembly process involves 3D printing the required parts, assembling the circuitry, attaching the electronics to the TARDIS case, and adding the windows, LED strip, and roof to complete the assembly. Detailed step-by-step instructions are provided.
What can I do with the fully assembled Raspberry Pi Doctor TARDIS?
The Raspberry Pi Doctor TARDIS creates an eye-catching and functional Raspberry Pi enclosure. The LED lighting allows for a dynamic visual display, while the audio playback adds an immersive audio experience. Users can customize the TARDIS further by choosing their own Doctor Who theme or sound effects.
Where can I find support and engage with the Raspberry Pi Doctor TARDIS community?
Users can join online forums and social media groups to connect with fellow enthusiasts and share their experiences. Platforms like Thingiverse and Cults3D provide a space for users to share their TARDIS designs and collaborate with others.
What is the benefit of building a Raspberry Pi Doctor TARDIS?
Building a 3D printed Raspberry Pi Doctor TARDIS is a rewarding project for Doctor Who fans and technology enthusiasts. With the availability of design files and step-by-step instructions, users can easily create their own TARDIS-inspired enclosure for their Raspberry Pi, bringing a touch of Whovian charm to their tech projects.